Showing posts with label hairstyle photos. Show all posts

Saturday, December 18, 2010

Hairstyle How-To: Asymmetrical Figure 8

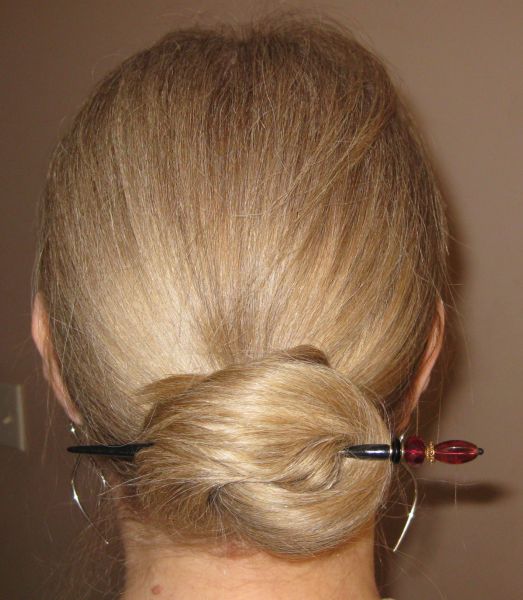
This sleek hairstyle can take you from office to holiday party, depending on how you accessorize it.

Here are some photos, clickable for larger pictures as always, with instructions following them.


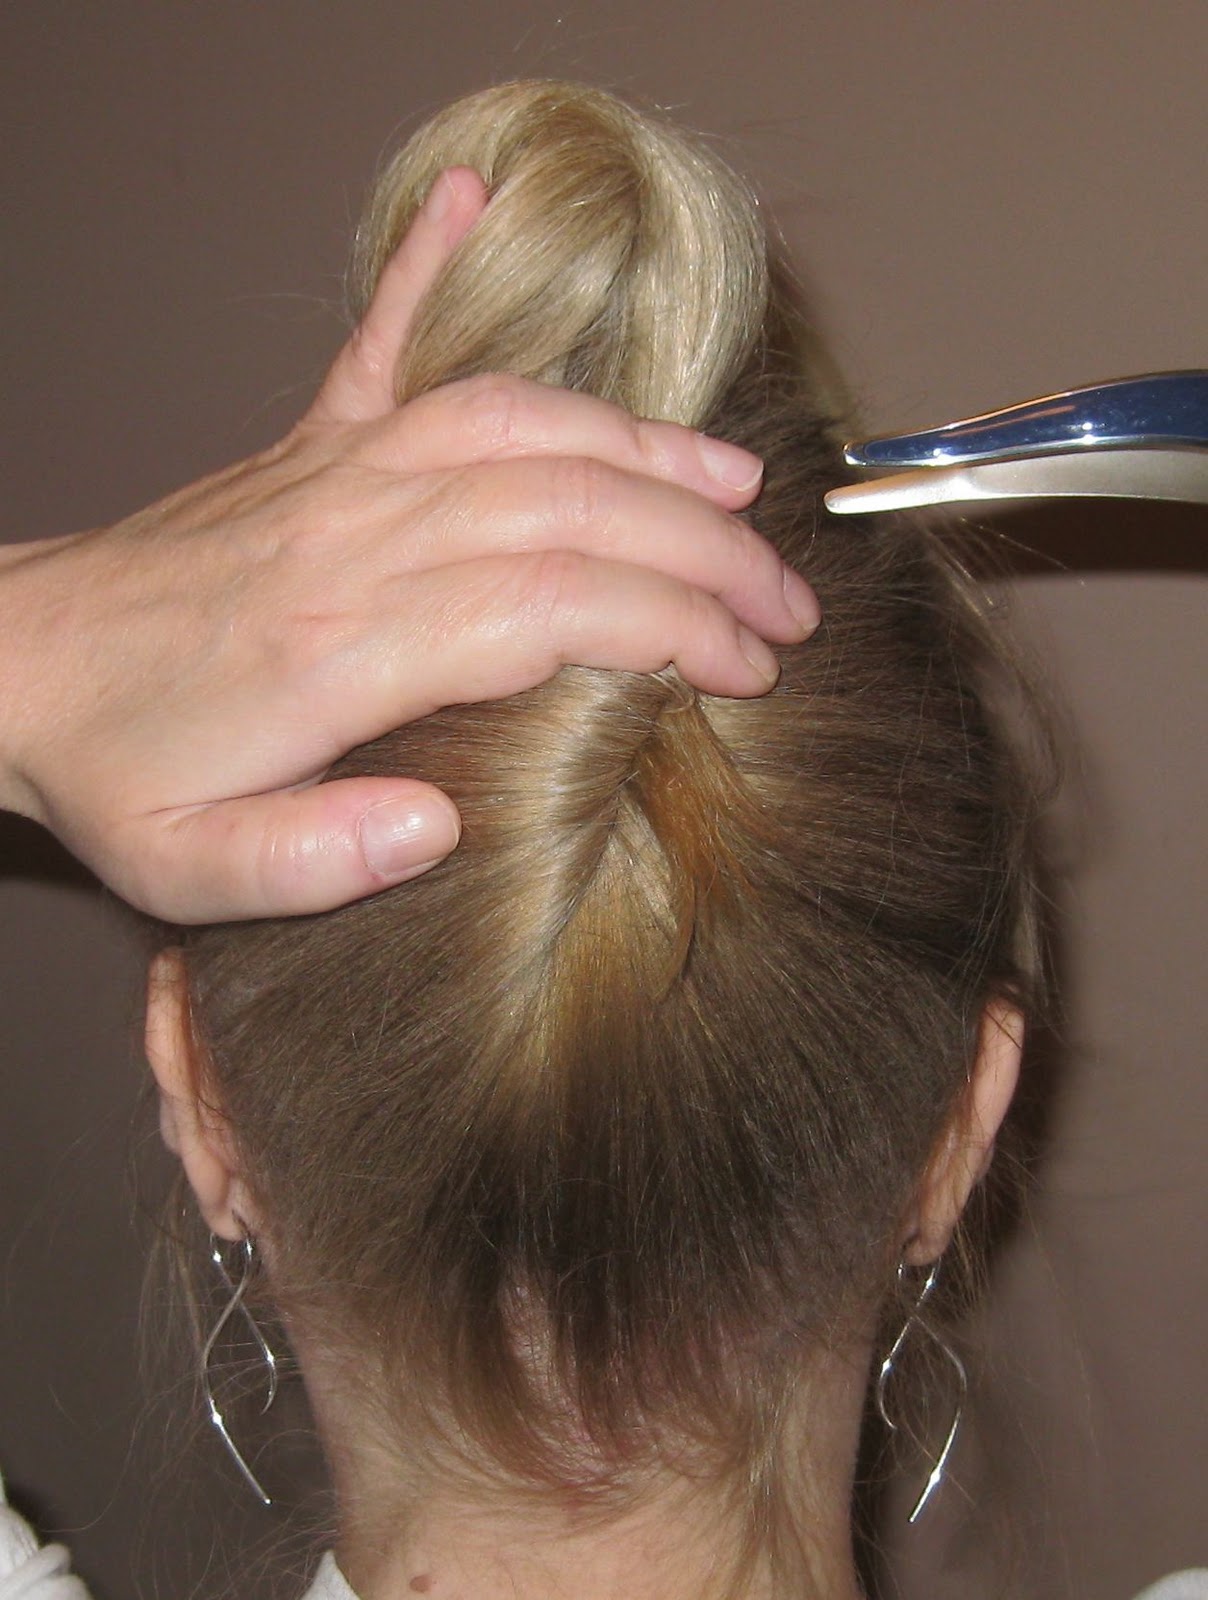
It's made by doing a Figure 8 updo as shown in this entry,  however, instead of moving the top coil of hair straight down to create the "8 effect", you move the coil in a slightly diagonal direction.

After that, move the coils to position them for your desired look. This makes it look much less like an 8.

Put in hair sticks and you're done. In these photos, I'm using Mei Fa Hairstyx in Raspberry.

Hope you're having a lovely pre-holiday weekend.

'Til tomorrow, my friends. Much love to all, and extra hugs to anyone feeling alone today.
xo

Friday, December 10, 2010

Hairstyle How To: Double Vertical Braids

This is an different variation on wearing a regular single braid or double braids. It doesn't look too interesting when you're standing still, but it creates an interesting swing when you walk.

I often do triple vertical braids, but for today i just did two. I didn't part the hair evenly enough into two sections that the braids were equal in width, but this gives you an idea of how it's supposed to look.


This is clearly an easy hairstyle to do.

Firstly, I parted my hair as if I were making a half-up, and I braided that area.

Secondly, I braided the remaining hair.

As I said earlier, this style has much more impact when one is moving. It creates an attractive swing, and has even more impact if you try three vertical braids.

'Til tomorrow, my friends. Much love to all.
xo

Monday, December 6, 2010

Hairstyle How-To: Franny's Easy Holiday Updo

I know that a lot of people are looking to try a new look in updos for the holiday season. I believe that the easier, the better, most of the time. This is another very quick and easy hairstyle that takes only a minimum of practice to achieve an optimal look. It's surprisingly impressive from behind, and shows quite nicely from the front. It's something like a French Twist with a large loop on the top and can make quite a bold statement if done correctly.

Here is a back view of the updo: (All photos are clickable for larger pictures and closer viewing.)


The Instructions:


1. Gather hair as if into a ponytail.

2. Loop ponytail around two fingers on left hand. (all of this will be opposite if your are left-handed.)

3. Twist the loop that you have created in a counter-clockwise direction.

4. Continue twisting loop until you run out of hair to twist.
5. When you've run out of hair to twist, tuck the ends into the French Twist-like portion of the hair and secure near the top of the twist and under the loop with a barrette or hair clip. In this example, I am using a medium Ficcare Maximas in Blue Jeans. I must mention that I did not end up tucking all of the ends into the twist in these particular photos.
6. Fan out loop, and leave it free, as I have done, or pin the loop in place to achieve your own desired look. You may want to pin some parts of the loop up and some in other directions for a different effect.

Here are two other photos of the finished product:


I hope that you'll give this updo a try. As I have mentioned it's extremely easy to do, and I'd love to hear how others have made it work with various hair types.

'Til tomorrow, my friends. Much love to all.
xo

Sunday, November 28, 2010

Hairstyle: Lace Rope Braided Half-Updo


No, I am not sporting beachy waves created by heat styling products today. :) I managed to resist

Instead I'm wearing a Lace Rope Braided Half-Up. As you can see in the second photo, I rope braided the sides of my hair, using the lace braid method, and then continued each rope braid until they met in the middle, where I fastened them together with a France Luxe Barrette.


Of course it's always in hindsight that I see all of the flaws in my photos. For example, the hair from the crown, above the braids, isn't as nicely combed as I would have liked, but as so often happens, things show up in photos that don't seem as obvious when I look in the mirror. Sometimes that flash acts almost like an x-ray, exposing every imperfection. Since it's dark outside now though, I had no choice but to use a flash.

I see that my perfectionism is trying to kick in. I am supposed to be breaking myself of that habit. Well, I guess that just posting these photos is proof that I'm at least making a bit of headway in that area.

In any case, this is a nice style idea for days when I want to enjoy my length, but keep the canopy hair somewhat protected by being out of the way.

This style could be varied by taking the two braids, combining them and then making a single braid from them. I'll be showing that type of combination braid in a future entry.


I am looking at the calendar, and I am almost in disbelief that November is almost over. Christmas is in less than a month!

I imagine that many of my friends managed to do Christmas shopping this past Friday, when there were some good sales on. I was not brave enough (or well enough) to venture to the stores that day.

I hope that everyone has had a good weekend.

'Til tomorrow, my friends. Much love to all.
xo

Friday, November 26, 2010

Hairstyle: Dutch Braided Bun

The hairstyle I'm wearing today is a Dutch Braided Bun. If you can make a regular French braid, you can make a Dutch or inverted braid. I've mentioned before that to make a Dutch Braid, you cross the middle strand over instead of under for every round of braiding.


I Dutch braided my hair and continued the braid to the ends and fastened it with a hair-friendly elastic. Then I took the braid, coiled it around itself and secured it with a Ficcarissimo in Emerald.

The braiding in these photos looks a bit loose. I think my hair was a bit too soft today to do a really nice tight Dutch braid. Sometimes it's easier to have a tighter braid a day or two after washing. However, if you know me, you know that I like looser braids just as much.


It's been a very windy day here today, and this is the first time it is actually starting to feel cold. We got the tiniest dusting of snow flurries. It was so light that it looked like the powdered sugar on a doughnut. Here for a few moments and then gone.


I hope that everyone has a lovely weekend.

'Til tomorrow, my friends. Much love to all.
xo

Monday, November 22, 2010

Hairstyle: Asymmetrical Boho Bun

Today I'm wearing an Asymmetrical Boho Bun.


I did a rather loose Dutch lace braid from my right temple to my left ear. Making a lace braid is just like making a regular French or Dutch braid, except that I only add new hair to the outermost strands as I go.

And to be honest, the term "Dutch braid" is really a misnomer, but it seems to be the common terminology for an inverted French braid. With a Dutch braid, the centre strand is always braided over the other two strands rather than under as in a usual French braid.

After I finished braiding, I just twisted a bun under my left ear and pinned it into place. It has a bit of a messy look, but it just doesn't look right to me if it's too perfect. It should look as though it's just thrown together.

I hope that everyone's week is off to a good start.

'Til tomorrow, my friends. Much love to all.
xo


Thursday, November 18, 2010

Hairstyle How-To: Twisted Crossed Half-Up

This style is just about the easiest half-updo that I know. However, I think it's elegant in its simplicity. (Photos clickable for larger image.)


I parted each side of my hair from the crown to the ears. I took the right side and twisted it inwardly three times, then took the left side and twisted it inwardly three times.

Then I crossed the left twist over the right twist and secured it with a Ficcare beak clip.

It really couldn't be easier.

For anyone who's wondering, I still have the migraine that started on Monday. I did however, get a better sleep last night. And once again, I'm happy to say that my spirits are good.

'Til tomorrow my friends. Much love to all.
xo

Wednesday, November 10, 2010

Hairstyle Photo: Loose Wavy Curls

As I mentioned on Monday, I curled my hair that day with large foam rollers to create very loose wavy curls. I used the method outlined in this blog entry, but this time I made smaller sections and used more curlers in the set  for more defined waves than what you see in the photo in that previous entry.


It still only took a few minutes to set my hair with just a spritz of water and my favourite hair-friendly Morrocco Method styling gel, which allows shine, but also holds extremely well without being crispy or sticky.

I wonder if any of you know how much fun it is for someone with such straight hair to have even a bit of volume.

If I had wanted tighter curls, I would have used smaller rollers, but really, I just wanted a bit of bend to my hair as well as some body.

For even longer lasting curls, I would go with a wet set and keep the rollers in until they dried, but even with this method, my hair was still wavy the next morning after taking my hair out of my bedtime bun.

I appreciated the comments to yesterday's entry and I have replied to all in the comments section. I seem to be getting much better at doing that.

Anyway, that's it for today, short and sweet.

'Til tomorrow, my friends. Much love to all.
xo

Friday, November 5, 2010

Hairstyle How-To: Tucked Draped French Braid

My hair wasn't up to having a length photo taken today, but I took a photo of the hairstyle of the day instead. 


This hairstyle is a Tucked Draped French Braid. It's a very simple style, if you know how to French braid.

To create a Draped French Braid, you don't French braid the hair at the scalp. Instead, you hold the strands out from the head at a 90 degree angle and braid there. As you add each new strand, you add it at the same 90 degree angle, parallel to the floor.

After finishing the braid, secure with a hair friendly elastic. Roll the tail up, and pin it to the nape, and that's it!


I hope everyone has a wonderful weekend. Happy birthday Lulu, and I hope that your celebration this evening is a lovely one.


'Til tomorrow, my friends. Much love to all.
xo

Saturday, October 23, 2010

Hairstyle: Wrapped Hairstick Bun with Tucked Ends

Well, my hair is now long enough for me to do my Wrapped Hairstick Bun with the ends tucked in without aid of any hairpins. I can just tuck the ends under before the final push-through of the hairstick.

This is what it looks like with the ends tucked in.


So I guess I've reached yet another mini-milestone. It's always nice to see progress, even in the smallest ways. I couldn't do this two weeks ago.

In just over a week it's time for me to do my quarterly length comparison update. I hope that there is enough difference in length to show a good 3 month difference from the first of August to the first of November.

There was no real difference between May and August, as only the sides were longer. I had trimmed off the "V" at the centre of the length, so that took off two inches of overall length. I'm looking forward to seeing a visible difference this time, as I haven't had any big trims.

It was a lovely, sunny morning, and then suddenly it started to rain. It just seemed to come out of nowhere. I certainly don't mind the rain, but it did come as a surprise. Well, I guess one should never be surprised by the weather in October. It's a very changeable month.

So that's it for today. I'm off to enjoy my Saturday night in a quiet way. I hope you all are having a wonderful weekend too, wherever you are.

'Til tomorrow, my friends. Much love to all.
xo

Thursday, October 21, 2010

Embellish Your Ponytail: French Braided Ponytail

This is another way to jazz up a simple ponytail or even a simple low bun.

I simply French braided my hair to the nape, and then wrapped the ponytail with a hair safe elastic. In this photo, I used a hair Bunjii, which is extremely hair friendly, but unfortunately is no longer being manufactured.


It's quick, it's easy and it just adds a bit of interest to an otherwise simple style.


On another note altogether, it's been a strange day weather-wise here today. It rained, it was sunny, it rained, it was sunny, but it's been fairly mild out. The only thing is that I've never known from one moment to the next if it will be nice enough to go for a walk or not. It's been completely unpredictable. Right now it's raining again, just since I started writing.

Wow, Friday tomorrow already. This week has been a blur for me.

I've still not caught up on my sleep but I'm feeling a bit better emotionally today. Whatever is going on with my hormones just might be stabilizing. I'm keeping my fingers crossed.  

'Til tomorrow, my friends. Much love to all.
xo

Friday, October 15, 2010

Embellish Your Ponytail: Side Rolls

I've been in a bit of a style rut again lately. I've pretty much just been putting my hair up in simple cinnamon buns. I haven't even been braiding of late.

Sometimes it's nice to wear a really simple style like a ponytail, but it's nice to spice it up a little. You can embellish it with some 2 or more small accent braids, as I did when I mentioned embellishing a simple updo (sometimes if I have time, I use 6 or 8 accent braids), or you can try some simple rolls, which add a nice, elegant effect.

In this photo I just twisted each side of my hair into a roll before fastening the ponytail with a small Ficcare Maximas (Antique Gold with Aurora Borealis Crystals).

Twists are so quick and easy to do, and they even make my fine, straight hair look more interesting in a ponytail.

However, I find that rolls are much more impressive in wavy or curly hair. They're just as easy to make, but they make more of a statement.


I would love to figure out how to make my hair look its true colour in every photo. It either looks too dark, as it does today, or it looks too light or bright. Once in a while it looks as it does in real life, but not often. Some people really have the art of consistency down, but I just don't have it. Any ideas?


Well, it's just about time to make another video. Sometimes I still can't believe I actually make those videos and put them on the Internet for anyone to see. I was hoping to do a Celtic Knot soon, because I've had a few requests, but I can see and feel that it will be a few months before I can make a decent Celtic Knot again. I'll think of something. Maybe I'll do an Infinity Bun or a Tucked French Braid.


Good heavens, the weekend is here already! I said it yesterday and I'll say it again. This week has just flown by! Today has been nice and sunny, cool but not cold. I hope the weekend is just as nice. Whatever the weather, I wish you all a lovely weekend.

'Til tomorrow. Much love to all.
xo

Friday, October 8, 2010

Hairstyle: Herringbone Braid Half-Updo and: 6 Months of Blogging

Hi everyone! Thank you all for the good wishes. I did sleep well last night and I was indeed able to enjoy the beautiful day we've had here today. Lulu, you're right; it's been just like a perfect summer day.

Today marks six months since I started this blog. I couldn't have imagined then that I would write an entry every day for six months.

Since April 8, 2010, this blog has been visited by people from 2036 cities in 89 different countries who have spent a total time of 24 days and 7 hours reading (my own family is not included in these stats). My blog is small potatoes compared with the longtime career bloggers, but it still boggles my mind that anything I've done has managed to reach all corners of the earth.

If you're under 40, you likely can't grasp just how mind-blowing it really is. When I was a young woman, just making an overseas phone call was still a big deal and we couldn't ever have imagined a day when just about everyone would have a cell phone. The last thing we could have imagined would have been having the ability to connect with people all over the world via something like the Internet. It amazes me still, when I think about it.

Writing this blog has reminded me that one is never too old to try something new. It has helped me to get over myself, and not worry if I write something that someone might find foolish, post a photo that is not perfect, or make a video in which I'm stumbling over my words. It's something I simply couldn't have done five years ago.

So for those of you who are still in your 20s or early 30s, and you're starting to feel the panic of "running out of time", please know that you can change and grow and learn new things throughout your life. You don't have to do it all now. There is still so much to look forward to, and let me also tell you another thing. Being 50 is not the same as being old.

Most of all, I am filled with gratitude daily for the comments and feedback that some of you leave, and for the emails and messages I receive. Believe me, you all give me so much more than I am giving and I am truly grateful.


Okay, now about hair. Today I've done a herringbone braid half-up. A herringbone braid is one of the simplest braids to do, but I do have to warn you; it can be tiring to do, especially on really long hair. The strands are small, and it takes patience. However, it's extremely easy, so that makes up for it.

As you can see, my braid in these photos is not perfect, but I still like the way it looks. Perfection is over-rated.  Photos can be clicked to enlarge them.


For those of you who have never made a herringbone braid, a half-up is a nice way to start.

To make a herringbone braid all you need to do is


  1. Divide hair into two sections.
  2. Take a small amount of hair from the outer portion of the left section and transfer it to the right section.
  3. Now take a small amount of hair from the outer portion of the right section and transfer it to the left section.
  4. Repeat until you have as much hair braided into a herringbone as you wish. 
  5. Tie off the end with a hair-friendly elastic.
Another way that many people like to do a herringbone braid is to make a ponytail first with a hair-friendly elastic and then do steps 1-5. I like to do it without a ponytail tie to start, because I like the v-shape it makes at the top, but both ways are pretty.

To my Canadian friends, I wish you all a very happy Thanksgiving weekend. I hope that you spend time with people whom you love, and if not, that you can connect with them in some way.

'Til tomorrow, my friends. Much love to all, and extra hugs to anyone who is worried today.
xo

Monday, October 4, 2010

Hairstyle: Mini-Basket-Weave Half-Updo

First of all, thank you for your comments and show of support yesterday. It was a rough day and you all helped me stick to my resolve to trim very slowly until my damage is gone rather than give way to thoughts of cutting it all out at once. It is so true that I would regret it. And it's a good lesson for me to live with my hair being less than perfect. It's also true that we are our own worst critics. 


Today I had a nice visit with an old friend. We've been friends for over 30 years, since I was just a slip of a girl of only 18. We try to meet up once a month for a few hours, just to keep up and to share our new favourite books and movies, and to catch up on one anothers' lives. It was very pleasant, and it has become an important ritual to me.


I still haven't managed to quite figure out the new hairstyle I have in mind that I mentioned on Saturday. I won't mention it again until I have a handle on it.


I will share with you today's hairstyle. Now that it's getting cooler, sometimes I like to be able to wear half-updos, which keep the delicate canopy hair out of harm's way, but still allow me to show some length.

This is one of the very first half-up hairstyles I learned, other than a simple half-up ponytail, many years ago. I saw it in a magazine long before I joined LHC and began to attempt more difficult styles.

Photos are clickable, as always, for more detailed viewing.


I like this half-up because anyone can do it, and it's just a bit more interesting than a regular half-tail. It works best with a beak clip. In these photos, I'm using a medium-sized Ficarre Innovation beak clip in Pink Marble,  but I used to use a simple Goody beak clip that I purchased at  the drug store that was extremely inexpensive.

To make this style, I parted my hair from ear to ear over the top of my head. I then pulled back the front section I had just parted as if I were about to make a ponytail. I then divided that "ponytail section" into four equal strands. After that, wove the outermost left strand towards the right: under the next strand, over the next, and under the next. Then I took what was now the second strand from the right and wove towards the left:  under the next strand, and over the next.

Then I secured it with the beak clip, concentrating primarily on the left-hand side. It's nothing terribly fancy or exciting, and it's very easy, but it's just a little bit different. I hope you like it.

'Til tomorrow, my friends. Much love to all.
xo

Friday, September 10, 2010

Hairstyle How-To: 3 Braid Half-Up

This hairstyle is inspired by Arwen's half-up hairstyle in one of the Lord of the Rings movies.  It's really easy and it's kind of fun.

To make this hairstyle I:

1. Parted my hair across the top of my head, from ear to ear. I clipped that hair up and out of the way and put the length in a ponytail to also keep that out of the way. The hair clipped up is my half-up hair.

2. I parted the front section I had made in the middle.

3. I then took the left side and divided it in half vertically from part to hairline.

4. I braided the front half of the left side of my hair.

5. I then took the right side and divided it in half vertically from part to hairline.

6. I braided the front half on the right side of my hair.

7. I took the loose section that remained from the original part (the back of the left and right sides of the half-up hair) and braided it.


All of the photos are clickable. It's really easy to see, especially on the right side, the breakage that I'm gradually cutting out. 

And just for fun, here is a comparison of this hairstyle made today with a photo of this hairstyle made on January 19th of this year. The length of my hair looks thicker in the January photo, but that's because I put less of my hair in the half-up section.


It's a nice reminder that my hair really has grown in 8 months, despite my regular trims and cutting 2 inches off of the tip of my V-shape in June.

Hope you like this style.

I tried the lemon juice rinse today, and my hair is very soft and shiny. It's too soon to really tell about the frizz. but my hair is nice and smooth.

My verdict:: too soon to tell for a straightie, but I'll be doing it for the next few washes.

'Til tomorrow, my friends. Much love and extra hugs to anyone who is missing someone today.
xo

Monday, September 6, 2010

Happy Labour Day!

Well, it's Labour Day already: the unofficial end of summer. It's been an interesting long weekend weather-wise.

I always still feel very wistful on Labour Day, as here in Ontario, the first day of elementary and secondary school always starts the day after Labour Day. It's funny that it's been some 31 years since those days for me, and even my kids are no longer in school, but the feeling of that fresh start that the new school year brings is still with me.

I've always loved this time of year. It has so often heralded new friendships, and new experiences. I also love the weather of the impending autumn. I suppose I'll carry that feeling with me until the day I die.

Not much to say about my hair today, so I'll just post some photos of how I'm wearing my hair today. It's sort of a crown braid, but not really, because it circles the back of my head rather than the crown. Of course it's done exactly the way I do a crown braid. If anyone can think of a more appropriate name for the braid in this placement, I'm open to ideas. Crown braid just doesn't sound right.

I like the way the wisps are blowing in the breeze in the third photo.


I lace braid my hair to do crown braids, rather than French braiding the regular way. Lace braiding is just like French braiding, except that I only pick up the hair on the outer side of my head for each plait. I find it not only quicker and easier, but I also like that the hair in the centre of the braid is not all parted for each braid strand.

This braid is an inverted lace braid, commonly called a Dutch Lace Braid.

I hope that everyone who has had a long weekend has enjoyed it.

'Til tomorrow, my friends. Love to all.

Sunday, September 5, 2010

The Style I Tried Today


Today I tried a new hairstyle. It's a Lazy Wrap Bun. It needs a bit of work and some polish, but I'll show you how it turned out today anyway.


It's a very quick and easy style, it's protective and requires almost no manipulation, such as twisting.

Once I get this down pat, I'll make a video how-to of this style. I think I like it. It's simple, but it could look very elegant, if smoothed down neatly. I am only using the one Mei Fa Raspberry hair stick to hold it, but it's very secure.

I finally trimmed my bangs today. I was considering yet again growing out part of my bangs, but I ended up cutting them in full again today.

It's beautiful and sunny as I write this, and not too hot. Actually, it was downright chilly this morning. I think it might get hotter again tomorrow, but not too hot.

I'm feeling a bit better yet again today, although I woke up at 4:30 a.m. this morning, so I'm looking forward to a better night's sleep tomorrow.

'Til tomorrow, my friends. Much love to all and extra hugs to anyone feeling anxious today.

Friday, August 27, 2010

Hairstyle How-To: Folded Braid

Well, I'm just barely starting to feel a bit better, so I'm still not feeling too chatty, but I do have some instructions for a really simple style. It works with shorter hair, and looks great with much longer hair. As long as you have hair long enough to braid, you can make a version of this simple, casual style.

1. Make a braid high up on the head and fasten the ends with a hair friendly elastic.


2. Fold braid under and bring tasseled ends right up to the base of the braid.


3. Shape hair into place and fasten with a barrette or a spring clip. In these photos, I am wearing a Ficcare Ficcarissimo in Emerald. You can play around with the placement of the clip and how you arrange your braid. This style can look very different depending on how you place your braid and barrette. For a more finished look, lightly dampen the hair first and perhaps use Aloe Vera Gel, or hair friendly styling gel.

For every day, I like the slightly dishevelled look, as anyone who follows this blog knows.


Still hoping to feel better tomorrow. I'm hankering for a good yak. Thanks again to all who have sent get well wishes, and positive thoughts.

Love to all. 'Til tomorrow.

Monday, August 23, 2010

Rose Bun

Today I'm wearing a Rose Bun. I made it by putting my hair in a ponytail, dividing the ponytail into three and then making three separate Rope Braids. Written instructions on how to make a Rope Braid can be found in this entry.


After the Rope Braids were made, I then coiled all three braids, pinned them into place and created the Rose Bun.


In these photos, there are a lot of sticking-out ends. If I were planning on having a more polished look for an evening out, I would likely dampen my hair with distilled water and perhaps add a bit of gel before making both the ponytail and the Rope Braids. I might also add a hair stick or another hair accessory for adornment only. In a future entry, I'll post photos of such a polished Rose Bun.

Before too long, I'll make an instructional video for making Rope Braids for those of you who prefer visual instructions.

I enjoyed and appreciated the comments to yesterday's entry, and I will respond tomorrow in the comments section. I'm still having a rough go with the migraines, and I can't spend any more time writing today.

'Til tomorrow, my friends. Much love to all.