Showing posts with label hairstyles. Show all posts

Saturday, October 23, 2010

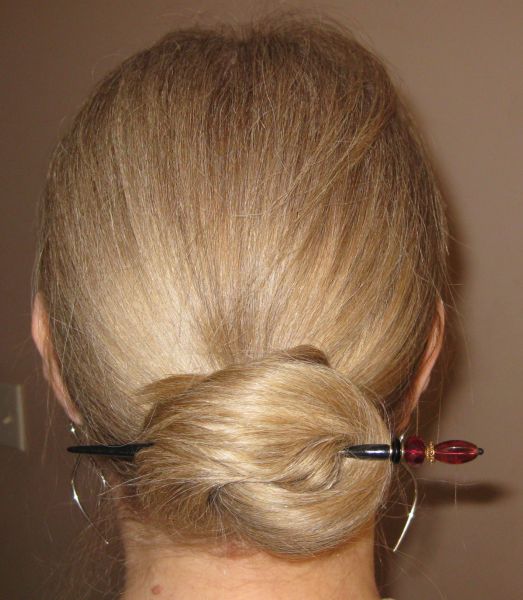
Hairstyle: Wrapped Hairstick Bun with Tucked Ends

Well, my hair is now long enough for me to do my Wrapped Hairstick Bun with the ends tucked in without aid of any hairpins. I can just tuck the ends under before the final push-through of the hairstick.

This is what it looks like with the ends tucked in.


So I guess I've reached yet another mini-milestone. It's always nice to see progress, even in the smallest ways. I couldn't do this two weeks ago.

In just over a week it's time for me to do my quarterly length comparison update. I hope that there is enough difference in length to show a good 3 month difference from the first of August to the first of November.

There was no real difference between May and August, as only the sides were longer. I had trimmed off the "V" at the centre of the length, so that took off two inches of overall length. I'm looking forward to seeing a visible difference this time, as I haven't had any big trims.

It was a lovely, sunny morning, and then suddenly it started to rain. It just seemed to come out of nowhere. I certainly don't mind the rain, but it did come as a surprise. Well, I guess one should never be surprised by the weather in October. It's a very changeable month.

So that's it for today. I'm off to enjoy my Saturday night in a quiet way. I hope you all are having a wonderful weekend too, wherever you are.

'Til tomorrow, my friends. Much love to all.
xo

Thursday, October 21, 2010

Embellish Your Ponytail: French Braided Ponytail

This is another way to jazz up a simple ponytail or even a simple low bun.

I simply French braided my hair to the nape, and then wrapped the ponytail with a hair safe elastic. In this photo, I used a hair Bunjii, which is extremely hair friendly, but unfortunately is no longer being manufactured.


It's quick, it's easy and it just adds a bit of interest to an otherwise simple style.


On another note altogether, it's been a strange day weather-wise here today. It rained, it was sunny, it rained, it was sunny, but it's been fairly mild out. The only thing is that I've never known from one moment to the next if it will be nice enough to go for a walk or not. It's been completely unpredictable. Right now it's raining again, just since I started writing.

Wow, Friday tomorrow already. This week has been a blur for me.

I've still not caught up on my sleep but I'm feeling a bit better emotionally today. Whatever is going on with my hormones just might be stabilizing. I'm keeping my fingers crossed.  

'Til tomorrow, my friends. Much love to all.
xo

Monday, October 4, 2010

Hairstyle: Mini-Basket-Weave Half-Updo

First of all, thank you for your comments and show of support yesterday. It was a rough day and you all helped me stick to my resolve to trim very slowly until my damage is gone rather than give way to thoughts of cutting it all out at once. It is so true that I would regret it. And it's a good lesson for me to live with my hair being less than perfect. It's also true that we are our own worst critics. 


Today I had a nice visit with an old friend. We've been friends for over 30 years, since I was just a slip of a girl of only 18. We try to meet up once a month for a few hours, just to keep up and to share our new favourite books and movies, and to catch up on one anothers' lives. It was very pleasant, and it has become an important ritual to me.


I still haven't managed to quite figure out the new hairstyle I have in mind that I mentioned on Saturday. I won't mention it again until I have a handle on it.


I will share with you today's hairstyle. Now that it's getting cooler, sometimes I like to be able to wear half-updos, which keep the delicate canopy hair out of harm's way, but still allow me to show some length.

This is one of the very first half-up hairstyles I learned, other than a simple half-up ponytail, many years ago. I saw it in a magazine long before I joined LHC and began to attempt more difficult styles.

Photos are clickable, as always, for more detailed viewing.


I like this half-up because anyone can do it, and it's just a bit more interesting than a regular half-tail. It works best with a beak clip. In these photos, I'm using a medium-sized Ficarre Innovation beak clip in Pink Marble,  but I used to use a simple Goody beak clip that I purchased at  the drug store that was extremely inexpensive.

To make this style, I parted my hair from ear to ear over the top of my head. I then pulled back the front section I had just parted as if I were about to make a ponytail. I then divided that "ponytail section" into four equal strands. After that, wove the outermost left strand towards the right: under the next strand, over the next, and under the next. Then I took what was now the second strand from the right and wove towards the left:  under the next strand, and over the next.

Then I secured it with the beak clip, concentrating primarily on the left-hand side. It's nothing terribly fancy or exciting, and it's very easy, but it's just a little bit different. I hope you like it.

'Til tomorrow, my friends. Much love to all.
xo

Friday, September 10, 2010

Hairstyle How-To: 3 Braid Half-Up

This hairstyle is inspired by Arwen's half-up hairstyle in one of the Lord of the Rings movies.  It's really easy and it's kind of fun.

To make this hairstyle I:

1. Parted my hair across the top of my head, from ear to ear. I clipped that hair up and out of the way and put the length in a ponytail to also keep that out of the way. The hair clipped up is my half-up hair.

2. I parted the front section I had made in the middle.

3. I then took the left side and divided it in half vertically from part to hairline.

4. I braided the front half of the left side of my hair.

5. I then took the right side and divided it in half vertically from part to hairline.

6. I braided the front half on the right side of my hair.

7. I took the loose section that remained from the original part (the back of the left and right sides of the half-up hair) and braided it.


All of the photos are clickable. It's really easy to see, especially on the right side, the breakage that I'm gradually cutting out. 

And just for fun, here is a comparison of this hairstyle made today with a photo of this hairstyle made on January 19th of this year. The length of my hair looks thicker in the January photo, but that's because I put less of my hair in the half-up section.


It's a nice reminder that my hair really has grown in 8 months, despite my regular trims and cutting 2 inches off of the tip of my V-shape in June.

Hope you like this style.

I tried the lemon juice rinse today, and my hair is very soft and shiny. It's too soon to really tell about the frizz. but my hair is nice and smooth.

My verdict:: too soon to tell for a straightie, but I'll be doing it for the next few washes.

'Til tomorrow, my friends. Much love and extra hugs to anyone who is missing someone today.
xo

Monday, September 6, 2010

Happy Labour Day!

Well, it's Labour Day already: the unofficial end of summer. It's been an interesting long weekend weather-wise.

I always still feel very wistful on Labour Day, as here in Ontario, the first day of elementary and secondary school always starts the day after Labour Day. It's funny that it's been some 31 years since those days for me, and even my kids are no longer in school, but the feeling of that fresh start that the new school year brings is still with me.

I've always loved this time of year. It has so often heralded new friendships, and new experiences. I also love the weather of the impending autumn. I suppose I'll carry that feeling with me until the day I die.

Not much to say about my hair today, so I'll just post some photos of how I'm wearing my hair today. It's sort of a crown braid, but not really, because it circles the back of my head rather than the crown. Of course it's done exactly the way I do a crown braid. If anyone can think of a more appropriate name for the braid in this placement, I'm open to ideas. Crown braid just doesn't sound right.

I like the way the wisps are blowing in the breeze in the third photo.


I lace braid my hair to do crown braids, rather than French braiding the regular way. Lace braiding is just like French braiding, except that I only pick up the hair on the outer side of my head for each plait. I find it not only quicker and easier, but I also like that the hair in the centre of the braid is not all parted for each braid strand.

This braid is an inverted lace braid, commonly called a Dutch Lace Braid.

I hope that everyone who has had a long weekend has enjoyed it.

'Til tomorrow, my friends. Love to all.

Sunday, September 5, 2010

The Style I Tried Today


Today I tried a new hairstyle. It's a Lazy Wrap Bun. It needs a bit of work and some polish, but I'll show you how it turned out today anyway.


It's a very quick and easy style, it's protective and requires almost no manipulation, such as twisting.

Once I get this down pat, I'll make a video how-to of this style. I think I like it. It's simple, but it could look very elegant, if smoothed down neatly. I am only using the one Mei Fa Raspberry hair stick to hold it, but it's very secure.

I finally trimmed my bangs today. I was considering yet again growing out part of my bangs, but I ended up cutting them in full again today.

It's beautiful and sunny as I write this, and not too hot. Actually, it was downright chilly this morning. I think it might get hotter again tomorrow, but not too hot.

I'm feeling a bit better yet again today, although I woke up at 4:30 a.m. this morning, so I'm looking forward to a better night's sleep tomorrow.

'Til tomorrow, my friends. Much love to all and extra hugs to anyone feeling anxious today.

Thursday, July 29, 2010

Video How-To: Gibson Tuck

The Gibson Tuck is a great protective updo, but it gets harder to do the using the usual instructions after hair gets much longer than shoulder length. This video gives step by step instructions on how to do the Gibson Tuck for longer hair.  


I hope that this video is of help to some of you.

'Til tomorrow, my friends.  Love to all.

Sunday, July 18, 2010

Hairstyle How-To: Annalee's Folded Twist

I based this hairstyle on one done by someone close to me by the name of--you guessed it--Annalee. :)

Here are the instructions.

1. Twist hair straight upwards, in a counterclockwise direction.

2. Place pinky finger of right hand as an anchoring spot near the crown of the head, and bring the twisted ponytail around the anchor.

3. Grasp the loop that has been formed and flip it to the left.

4. Place flipped loop against head. If you wish, you can wrap the ends and tuck them in.  I leave the tail hanging out. Prepare to secure the style with a hair fork, hair sticks or a hair clip.

5. Here is the finished style. I secured it with a Ficcare Maximas in Royal Blue (or Sapphire) from the Lotus Jewel II Collection.


I hope you like it, and I hope that everyone has had a wonderful weekend. 

Love to all!  'Til tomorrow, my friends.


Wednesday, May 12, 2010

Hairstyle How-To: 4 Strand Box Braid

Most of us can do a 3 strand braid without too much difficulty. The idea of learning how to do 4 and 5 strand braids is both intriguing and sometimes daunting.  I know it was a daunting idea for me, even 3 years ago.


I am one of those people who is truly all thumbs.  My typing is slow, my fingers aren't nimble--I feel as though I have no dexterity.


Yet, I was so charmed by the look of the 4 strand box braid and the 5 strand flat braid that I made it my business to learn how to do them, no matter how long it took.


I started learning each braid by doing it as a half-up braid.  Having less hair to work with seemed to make it much easier.  Also, doing a half-up allowed me to have a decent sized braid with more plaits than if I tried to braid the length of my hair.


It took me at least a week to learn the 4 strand box braid. It was really something new to try to figure out the fingering, even though I had the pattern firmly in my mind.


I remember that I would attempt making that 4 strand braid, and I would get a few rounds into it and then make a mistake.  I would then start over.  As soon as I felt the least bit frustrated, I called it quits for that day.


Yet, day by day, my fingering got better.  The muscle memory was beginning to get there.  Finally one day I made that 4 strand box braid in a half-updo!  After that, I knew how to do it forever.


The pattern for the box braid is very easy. It's a really nice looking braid because it has a 3-dimensional quality. 


1. Divide the hair in 4 equal strands.  


2. Mentally number the strands from left to right: 1, 2, 3, 4.  


3. Take strand 1. Bring it under strands 2 and 3 and then over strand 3.  It will now sit in the strand 2 place.


4. Take strand 4.  Bring it under strands 3 and 2 and then over strand 2.  It will now sit in the strand 3 place.


5. Rename the strand again from left to right, 1, 2, 3 and 4.  Repeat steps 3 and 4 until the braid is done.


If you have trouble with this, don't worry.  You are using fingering that you're not used to.  Yet I guarantee that with practice, anyone can do this.  You just need patience, and don't be frustrated if you don't learn it in a day.


Once you learn it, you will be able to start doing it in a French style too.  


Here is a photo of my 4 strand box braid half-up. It is held with a Scunci Ouchless Invisible elastic.  They're made of silicone, and I find them to be quite hair friendly, although they need a bit more care to remove than the regular Scunci elastics that I talked about earlier this week.


Have fun braiding!

Monday, April 19, 2010

Hairstyle How-To: Peacock Twist

This is a quick and easy hairstyle for people with shoulder-length to lower mid-back length hair.  It's a great first updo for when you're first growing out your hair.  Even at my length, I've just about grown out of it.  There are different ways to wear it, whether you use different clips, or whether you finish it by fanning the ends out, bending them to one side, or dividing them in two to both left and right.

On my hairstyle site, I've had several people write and request instructions for this style, so I'll give them in this entry. As I mentioned, my hair has gotten just about too long for it, but I'm adapting.

Here are the instructions:

1. Brush hair back and hold it as if ready to make a ponytail.
2. Twist hair several times in a counter-clockwise direction.


3. Pull twist upwards while twisting some more.


4. With right hand, grab a jaw clip, beak clip, French Twist comb, or the hair accessory of your choice.  I have chosen to use a medium Ficcare Innovation Beak Clip in Pink Marble.


5. Insert clip.  Arrange ends to the left as shown below.
6. Or for a traditional "peacock" look, clip a bit higher, if necessary and fan hair out as shown below.


And that's it!  You've got a Peacock Twist.  It will likely look a bit different every time you try it and at different lengths, and it is a quick updo that can be done in seconds, which can come in very handy.

Another variation would to be to part the ends in two and have them lean both to the left and the right.  Play with the placement of the clip and experiment with how you place the ends.  Have some fun with it!


Sunday, April 11, 2010

Beautiful Quiet Spring Sunday

Well, it was pretty quiet until a black squirrel started making all kinds of noise on the deck. I thought it was a crow, it was so loud.

Anyway, lots of sunshine and it finally feels as though spring is really here.

I did do my deep moisture treatment with 1 part honey and 2 parts conditioner today. My hair isn't completely dry yet, but I can really feel the difference. Nice and silky smooth again.

As a timesaver, instead of rinsing my hair prior to applying the moisture treatment, I thoroughly dampened my hair with a spray bottle of distilled water. When I got into the shower I added a bit of water, worked the conditioner with my fingertips and then put my hair up in a clip while I did my remaining showerly duties. I then rinsed my hair for about 3 minutes and finished of with a mild apple cider vinegar rinse. I use just a few tablespoons of ACV in a pitcher of water. It not only gets rid of the excess conditioner, but restores the natural acid mantle of the scalp. It also tends to close the cuticle of the hair, thus creating more shine.

I also cut my bangs. I think that I may have cut off about 1/8 of an inch too much, but that will take care of itself in about a week.

I think tomorrow I'll post a hairstyle photo here and add it to my website. I don't know yet what style I'm going to do, but I think I'll do a half-updo. Half-ups are a great way to protect the top layers of the hair (or the canopy) from damage. They're also a great way to do updos that your hair is too short for.

For example, at the moment I can't do a Figure 8 bun at my current length, but I can do a figure 8 half-up style. I love going through the various phases of growth and seeing what hairstyles do and don't work.

Well, it Sunday, it's a beautiful day, all is right with the world and that's about all I have to say for today.